svg标签
属性
width,height: 决定svg 的宽高
- 注意:默认宽高300*150,内部元素大于时,溢出部分被隐藏
viewBox: 定义svg可以显示的区域
- 语法:
- x,y为起始点,w,h为显示区域的宽高
- 示例:
- viewBox:以(0,0)为圆点,宽高为100*100的显示区域
- svg: 宽高300*300
- circle: 以(100,100)为圆点,半径为100
- 最终显示:viewBox在svg中截取的这一部分并放大到svg布局中,相当于viewBox区域放大3倍
1
2
3
| <svg width="300" height="300" viewBox="0 0 100 100">
<circle cx="100" cy="100" r="100"/>
</svg>
|
version: 指明SVG的版本和规范
- 目前只有1.0和1.1版本,只做说明,对渲染没有影响
xmlns和xmlns:xlink:
- svg是使用xml格式定义的图形,svg文件是纯粹的xml文件
- xmlns用于声明命名空间,再次声明下的所有子标签都属于这个空间内
- xmlns:xlink 表示前缀为xlink的标签和属性,应该由理解该规范的UA 使用xlink规范 来解释。
- 注解:UA是User Agent的简称。User Agent是Http协议中的一部分,属于头域的组成部分。通俗地讲UA是一种向访问网站提供你所使用的浏览器类型、操作系统、浏览器内核等信息的标识。通过这个标识,用户所访问的网站可以显示不同的排版,从而为用户提供更好的体验或者进行信息统计
1
2
3
| <svg xmlns="http://www.w3.org/2000/svg" xmlns:xlink="http://www.w3.org/1999/xlink">
</svg>
|
基本图形
- 以下所有代码都包裹在该svg标签中
1
2
3
4
5
6
| <svg
width="300"
height="300"
xmlns="http://www.w3.org/2000/svg"
style="border: 2px solid orange"
></svg>
|
圆 circle
- 语法:
1
| <circle cx="5" cy="5" r="4" />
|
- 参数:
- cx: 圆心所在x位置
- cy:圆心所在y位置
- r:圆的半径,决定圆大小
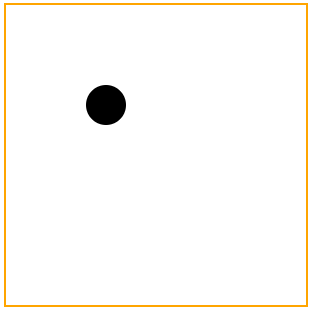
- 示例:
1
| <circle cx="100" cy="100" r="20"/>
|
矩形 rect
- 语法:
1
| <rect x="0" y="0" rx="5" ry="5" width="300" height="200" />
|
- 参数:
- x、y:矩形的起始点坐标
- rx、ry:为圆角x、y轴方向的半径
- width、height:为矩形的宽高
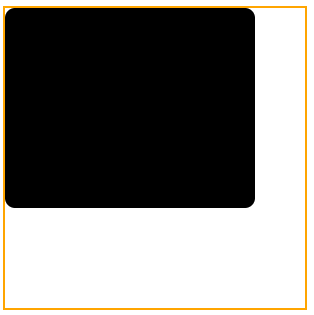
- 示例:
1
2
3
4
5
6
7
8
| <rect
x="0"
y="0"
rx="10"
ry="10"
width="250"
height="200"
/>
|
椭圆 ellipse
- 语法:
1
| <ellipse cx="100" cy="100" rx="100" ry="50"/>
|
- 参数:
- cx、cy: 椭圆的坐标,
- rx: 椭圆的x轴半径
- ry: 椭圆的y轴半径
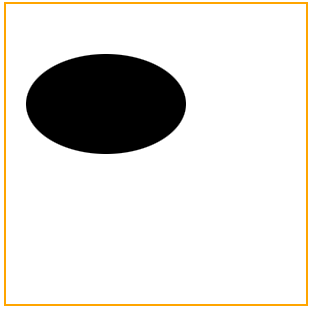
- 示例:
1
2
3
4
5
6
| <ellipse
cx="100"
cy="100"
rx="80"
ry="50"
/>
|
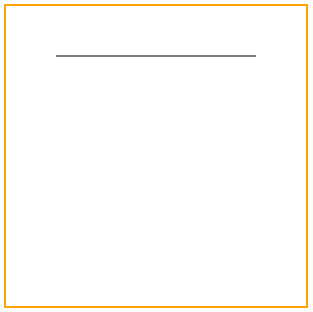
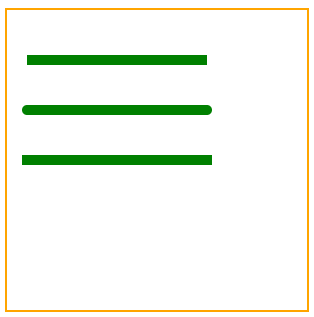
线条 line
- 语法:
1
| <line x1="10" x2="50" y1="110" y2="150" style="stroke:#dedede"/>
|
- 参数:
- x1、y1: 起点的坐标
- x2、y2: 终点的坐标
- 注意:『要设置样式才看的出来』
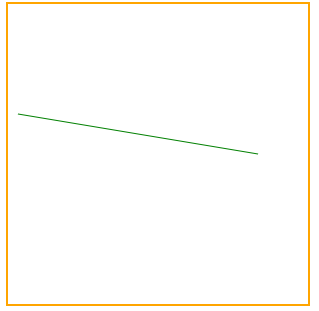
- 示例:
1
2
3
4
5
6
7
| <line
x1="10"
x2="250"
y1="110"
y2="150"
stroke="green"
/>
|
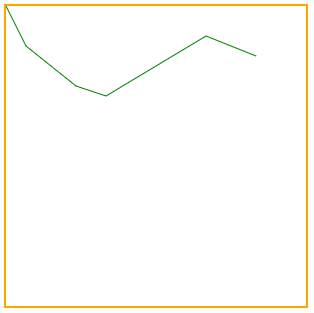
折线 polyline
- 语法:
1
| <polyline points="0 0, 20 40, 70 80, 100 90, 200 30, 250 50" />
|
- 参数:
- points: 点集数列,以x坐标 y坐标成对出现,多个用逗号隔开
- 注意:『polyline默认为填充需要把fill属性设置为none,再添加样式』
- 示例:
1
2
3
4
5
| <polyline
points="0 0, 20 40, 70 80, 100 90, 200 30, 250 50"
fill="none"
stroke="green"
/>
|
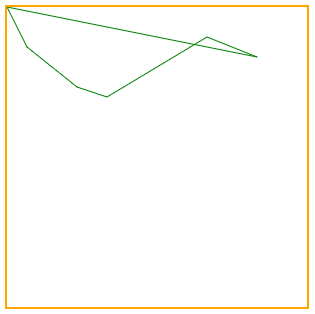
多边形 polygon
- 语法:
1
| <polygon points="0 0, 20 40, 70 80, 100 90, 200 30, 250 50" />
|
- 参数:
- points:点集数列,以x坐标 y坐标成对出现,多个用逗号隔开
- 注意:
- 『最后一个点和第一个点默认闭合,polyline不是』
- 『polyline默认为填充需要把fill属性设置为none,再添加样式』
- 示例:
1
2
3
4
5
| <polygon
points="0 0, 20 40, 70 80, 100 90, 200 30, 250 50"
fill="none"
stroke="green"
/>
|
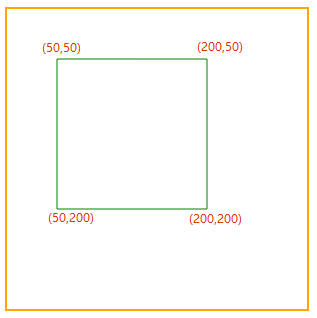
路径 path
- 语法:
1
| <path d="M50 50 H 200 V 200 H 50 L 50 50"/>
|
- 解释:从(50,50)出发水平画一条到(200,50)的线,然后从(200,50)垂直画一条(200,200)的线,然后从(200,200)水平画一条(50,200),最后把(50,200)和(50,50)连接起来
- 参数
- 示例:
1
2
3
4
5
| <path
d="M50 50 H 200 V 200 H 50 L 50 50"
fill="none"
stroke="green"
/>
|
路径 path
- 注意:『所有命令中大写为绝对定位,小写为相对定位』
path字母意义(简)
- M = Move to 移动
- L = Line to 线
- H = Horizontal Line to 水平线
- V = Vertical Line to 垂直线
- Q = Quadratic Bezier Curve to 二次贝塞尔曲线
- T = Smooth Quadratic Bezier Curve to 延长二次贝塞尔曲线
- C = Curve to 三次贝塞尔曲线
- S = Smooth Curve to 三次贝塞尔曲线延长
- A = Elliptical Arc 椭圆弧
- Z = close path 关闭路径
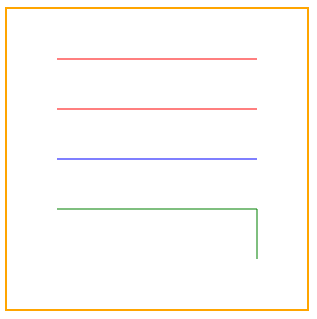
直线命令
M
- 路径的起始点,用来指明画笔从何处开始绘制。(还没画)
- 每一段路径都必须以M开头,如果有多个M命令则表示新路径开始
- 语法:
- 参数:
L
- 绘制一点并且和之前的点(也就是L命令前面的点)连成一条直线。
- 与M命令结合就是从M点到L点形成一条直线
- 语法:
- 参数:
- 示例1:从起始点(50, 50)画一条到(250, 50)的直线 和 从起始点(50, 100)画一条到(250, 100)的直线
- 注意:『M命令为多个时,后面的M命令为新线段的起始点』
- 示例2:从起始点(50, 50)画一条到(250, 50)的直线
- 注意:『M命令后面连续跟着多个坐标点,除了第一个坐标点,后面的全部默认为隐式的L命令』
- 示例3:从起始点(50, 50)画一条到(250, 200)的直线,然后画一条从(250, 200)到(250,250)的直线
- 注意:『多个L命令连续可以省略后面的L命令,并且前一个L跟后一个L相连』
1
2
3
4
5
6
7
8
|
<path d="M50 50 L250 50 M50 100 L250 100" stroke="red" />
<path d="M50 150 250 150" stroke="blue" />
<path d="M50 200 L250 200 250 250 " fill="none" stroke="green"/>
|
H
- 从前一个点绘制一条水平的直线,与前一个点为y相同,x不同
- 语法:
- 参数:
- 注意:『连续的H命令取最大值』
- 如:d=”M50 20 H250 100”,会直接从(50,20)到(250,20)
- 示例:从起始点(50, 50)画一条X坐标为250的水平直线,即把(50,50)和(250,50)连接起来的直线
1
| <path d="M50 50 H250" fill="none" stroke="green"/>
|
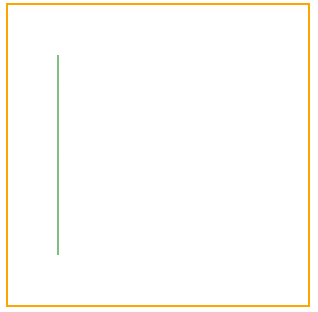
V
- 从前一个点绘制一条垂直的直线,与前一个点为x相同,y不同
- 语法:
- 参数:
- 注意:『连续的V命令取最大值』
- 如:d=”M50 20 V250 100”,会直接从(50,20)到(50,250)
- 示例:从起始点(50, 50)画一条Y坐标为250的垂直直线,即把(50,50)和(50,250)连接起来的直线
1
| <path d="M50 50 V250" fill="none" stroke="green"/>
|
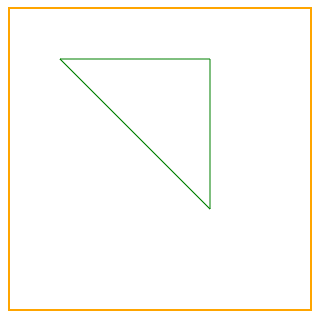
Z
- 从当前点画一条直线到路径的起始点
- 语法:
- 参数:无
- 示例:从起始点(50, 50)画一条X坐标为200的水平直线,然后再画一条Y200的垂直线条,然后闭合路径
1
| <path d="M50 50 H200 V200 Z" fill="none" stroke="green"/>
|
曲线命令
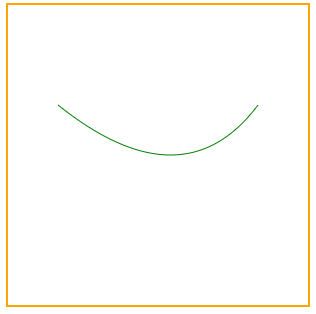
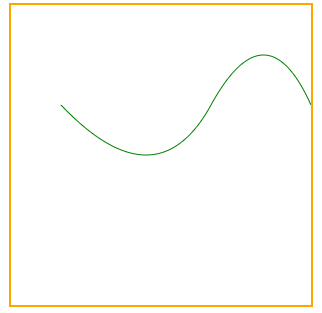
Q
- 绘制一条二次贝塞尔曲线,二次贝塞尔曲线需要一个控制点,用来确定起点和终点的曲线斜率。
- 语法:
- 绝对定位:Q x1 y1 x y
- 相对定位:q x1 y1 x y
- 参数:
- x、y: 终点位置
- x1、y1: 控制点
- 起点是M命令
- 示例:可以看出控制点就是弧度最低点或最高点
1
2
3
4
5
| <path
d="M50 100 Q 175 200 250 100"
fill="none"
stroke="green"
/>
|
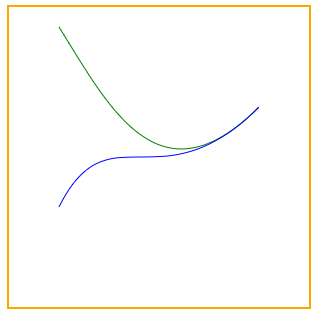
T
- 延长Q的简化命令。可以通过前一个控制点推断后一个控制点
- 语法:
- 参数:
- 注意:『T命令前面必须有一个Q或其他T命令。单独使用会被认为控制点和终点是同一个点,变成一条直线』
- 示例:
1
2
3
4
5
| <path
d="M50 100 Q 145 200 200 100 T 300 100"
fill="none"
stroke="green"
/>
|
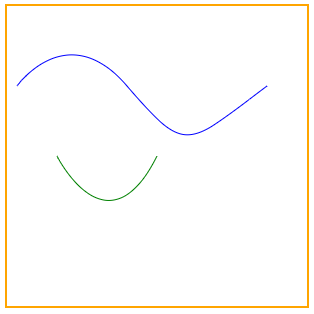
C
- 绘制一条三次贝塞尔曲线
- 语法:
- 参数:
- x、y:终点位置
- x1、y1:曲线起始点的控制点
- x2、y2:曲线终止的控制点
- 示例:x1,y1都过M来判断方向和x2,y2通过终点来判断方向,然后中间连接起来
1
2
3
4
5
6
7
8
9
10
| <path
d="M50 20 C 100 100 150 200 250 100"
fill="none"
stroke="green"
/>
<path
d="M50 200 C 100 100 150 200 250 100"
fill="none"
stroke="blue"
/>
|
S
- 与T相似,『跟在C或者其他S后面,那么第一个控制点被假设成前一个控制点的对称点』
- 『单独使用,它的两个控制点当做为同一个控制点』
- 语法:
- 参数:
- 示例:
1
2
3
4
5
6
7
8
9
10
| <path
d="M50 150 S 100 250 150 150"
fill="none"
stroke="green"
/>
<path
d="M10 80 S 60 10 120 80 S 180 140 260 80"
fill="none"
stroke="blue"
/>
|
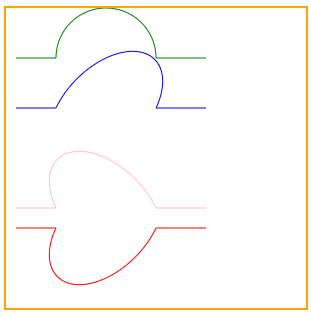
A
- 画弧形,可以截取圆或者椭圆的弧形成曲线
- 语法:
- 绝对定位:
1
| A rx ry x-axis-rotation large-arc-flag sweep-flag x y
|
- 相对定位:
1
| a rx ry x-axis-rotation large-arc-flag sweep-flag x y
|
- 参数:
- rx、ry:分别为X轴的半径和Y轴的半径
- x-axis-rotation:弧度在X轴的旋转角度
- large-arc-flag:决定弧线是大于还是小于180度,0表示小角度弧,1表示大角度弧
- sweep-flag: 弧的方向,0表示从起点到终点沿逆时针画弧,1表示从起点到终点沿顺时针画弧
- x、y:弧形的终点
- 示例:
1
2
3
4
5
6
7
8
9
10
11
12
13
14
15
16
17
18
19
20
21
22
23
24
|
<path
d="M10 50 50 50 A 30 30 0 0 1 150 50 L 200 50"
fill="none"
stroke="green"
/>
<path
d="M10 100 50 100 A 30 50 45 0 1 150 100 L 200 100"
fill="none"
stroke="blue"
/>
<path
d="M10 200 50 200 A 30 50 -45 1 1 150 200 L 200 200"
fill="none"
stroke="pink"
/>
<path
d="M10 220 50 220 A 30 50 45 1 0 150 220 L 200 220"
fill="none"
stroke="red"
/>
|
填充和轮廓
fill
- 用于填充图形,文本的颜色
- 语法:fill=”color” 或者 style=”fill:color”
- 『不设置时,默认填充为黑色』
- 取消默认填充:fill=”none”
fill-opacity
fill-rule
- 用来设置复杂形状的填充规则
- 填充方式:大概是判断图形绘制结束后,中间闭合的部分填不填充,图形一定会填充
- fnonzero 默认值,大部分中间填充
- fevenodd 大部分中间不填充
- nonzero:判断一个点是否在图形内,从该点做任意方向的一条射线,然后检测射线与图形路径的交点情况。从0开始计数,路径从左向右(顺时针)穿过射线则计数加1,从右向左(逆时针)穿过射线则计数减1。得出计数结果后,如果结果是0,则认为点在图形外部,否则认为在内部。
- evenodd: 要判断一个点是否在图形内,从该点作任意方向的一条射线,然后检测射线与图形路径的交点的数量。如果结果是奇数则认为点在内部,是偶数则认为点在外部。
stroke
- 线条、文本或者元素轮廓的颜色
- 语法:stroke=”color” 或者 style=”stroke=color”
- 如果不取消默认填充,在不设置宽度的情况下很难看的
stroke-width
stroke-opacity
stroke-linecap
- 轮廓终点的形状
- 语法:
- 属性值:
- butt: 默认,两端是直边
- round: 两端是圆角,圆角半径由stroke-width控制
- square: 两端是直边,但是两边会多出一小截,这一截由stroke-width控制
- 示例:
1
2
3
4
5
6
7
8
9
10
11
12
13
14
15
16
17
| <g
stroke="green"
stroke-width="10"
>
<path
stroke-linecap="butt"
d="M20 50 L200 50"
></path>
<path
stroke-linecap="round"
d="M20 100 L200 100"
></path>
<path
stroke-linecap="square"
d="M20 150 L200 150"
></path>
</g>
|
stroke-linejoin
- 轮廓连接处的样式(线段的交点样式)
- 语法:
- 属性值:
- miter: 默认,两条线相交,交点是一个直角
- round: 交点是圆角
- bevel:交点是直角但被切了一个三角形
- 示例:
1
2
3
4
5
6
7
8
9
10
11
12
13
14
15
16
17
18
19
20
21
| <g
fill="none"
stroke="green"
stroke-width="30"
>
<path
stroke-linecap="butt"
stroke-linejoin="miter"
d="M40 70 80 30 120 70"
></path>
<path
stroke-linecap="round"
stroke-linejoin="round"
d="M40 140 80 100 120 140"
></path>
<path
stroke-linecap="square"
stroke-linejoin="bevel"
d="M40 220 80 180 120 220"
></path>
</g>
|
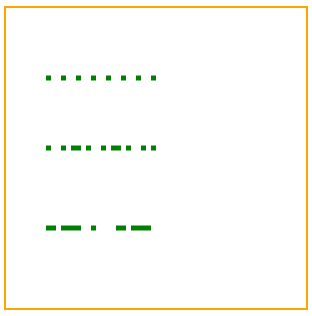
stroke-dasharray
- 轮廓变虚线
- 语法:
- 参数: 数值的形式,以线, 空格, 线段, 空格….不断循环
- 示例:可能上一轮回是线段长度,下一轮回是空格长度
1
2
3
4
5
6
7
8
9
10
11
12
13
14
15
16
17
18
| <g
fill="none"
stroke="green"
stroke-width="5"
>
<path
stroke-dasharray="5,10"
d="M40 70 150 70"
></path>
<path
stroke-dasharray="5,10,5"
d="M40 140 150 140"
></path>
<path
stroke-dasharray="10,5,20"
d="M40 220 150 220"
></path>
</g>
|
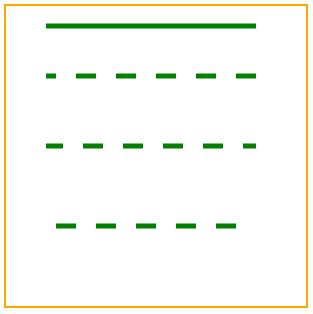
stroke-dashoffset
- 虚线的偏移量,按照固定的范围偏移
- 参数:正数 | 负数 | 百分比
- 『前提:要先设置好stroke-dasharray』
- 示例:
1
2
3
4
5
6
7
8
9
10
11
12
13
14
15
16
17
18
19
20
21
22
23
24
| <path
d="M40 20 250 20"
stroke="green"
stroke-width="5"
></path>
<g
fill="none"
stroke="green"
stroke-width="5"
stroke-dasharray="20"
>
<path
d="M40 70 250 70"
stroke-dashoffset="10"
></path>
<path
stroke-dashoffset="1%"
d="M40 140 250 140"
></path>
<path
stroke-dashoffset="-10"
d="M40 220 250 220"
></path>
</g>
|
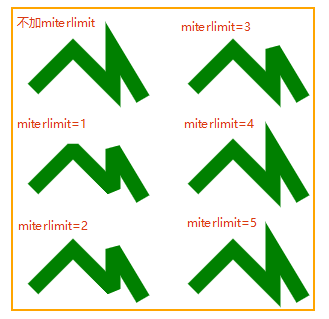
stroke-miterlimit
- 当两条线相交,且stroke-linejoin=”miter”,斜接可能远超过路径轮廓线的线宽。
- 『而stroke-miterlimit 对斜接长度和stroke-width的比率强加了一个极限。』
- 『当极限到达时,交汇处由斜接变成倒角。』
- 示例:
1
2
3
4
5
6
7
8
9
10
11
12
13
14
15
16
17
18
19
20
21
22
23
24
25
26
27
28
29
30
31
32
33
34
35
| <g
fill="none"
stroke="green"
stroke-width="15"
>
<path
stroke-linejoin="miter"
d="M20 80 60 40 100 80 100 40 130 90"
></path>
<path
stroke-linejoin="miter"
stroke-miterlimit="1"
d="M20 180 60 140 100 180 100 140 130 190"
></path>
<path
stroke-linejoin="miter"
stroke-miterlimit="2"
d="M20 280 60 240 100 280 100 240 130 290"
></path>
<path
stroke-linejoin="miter"
stroke-miterlimit="3"
d="M180 80 220 40 260 80 260 40 290 90"
></path>
<path
stroke-linejoin="miter"
stroke-miterlimit="4"
d="M180 180 220 140 260 180 260 140 290 190"
></path>
<path
stroke-linejoin="miter"
stroke-miterlimit="5"
d="M180 280 220 240 260 280 260 240 290 290"
></path>
</g>
|
文字
text 标签
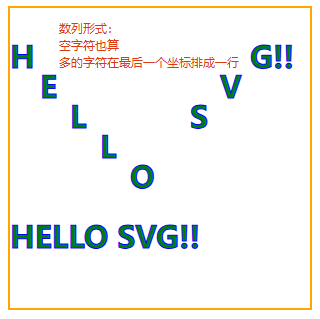
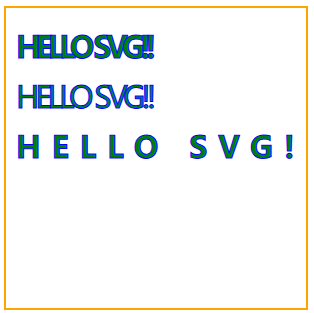
x 和 y
- 决定文字的起点位置
- 注意:『如果x和y是一个数列,则每个坐标会应用到每一个字符上,数列形式下空字符也算字符』
- 示例:
1
2
3
4
5
6
7
8
9
10
11
12
13
14
15
16
17
18
19
20
| <text
x="0 30 60 90 120 150 180 210 240"
y="60 90 120 150 180 150 120 90 60"
fill="green"
stroke="blue"
font-size="30"
font-weight="bold"
>
HELLO SVG!!
</text>
<text
x="0"
y="240"
fill="green"
stroke="blue"
font-size="30"
font-weight="bold"
>
HELLO SVG!!
</text>
|
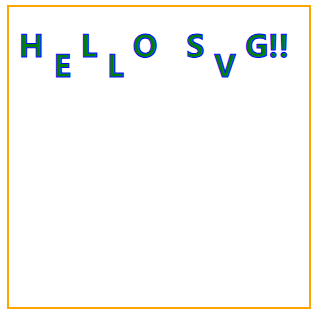
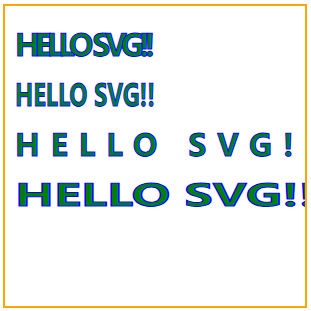
dx 和 dy
- 相对于当前位置的偏移量
- 注意:『如果参数是一个数列,则每个坐标会应用到每一个字符上,数列形式下空字符也算字符』
- 示例:
1
2
3
4
5
6
7
8
9
10
| <text
dx="10 10 10 10 10 10 10 10 10"
dy="50 20 -20 20 -20 20 -20 20 -20"
fill="green"
stroke="blue"
font-size="30"
font-weight="bold"
>
HELLO SVG!!
</text>
|
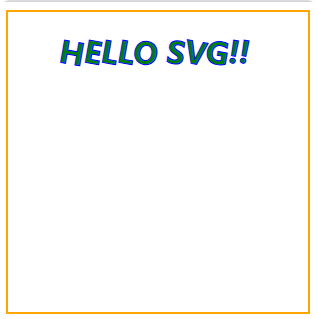
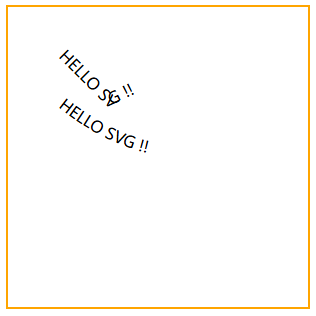
rotate
- 把文字旋转到一个角度
- 注意:『如果参数是一个数列,则每个坐标会应用到每一个字符上,数列形式下空字符也算字符』
- 示例:
1
2
3
4
5
6
7
8
9
10
11
| <text
x="50"
y="50"
rotate="10"
fill="green"
stroke="blue"
font-size="30"
font-weight="bold"
>
HELLO SVG!!
</text>
|
textLength
- 规定字符串的计算长度。在文字长度和textLength属性给定长度不一致的情况下,会自动调整字型的位置。
- 计算长度:包括了字体的大小,粗细
- 示例:
1
2
3
4
5
6
7
8
9
10
11
12
13
14
15
16
17
18
19
20
21
22
23
24
25
26
27
28
29
30
31
32
33
| <text
x="10"
y="50"
textLength="140"
fill="green"
stroke="blue"
font-size="30"
font-weight="bold"
>
HELLO SVG!!
</text>
<text
x="10"
y="100"
textLength="140"
fill="green"
stroke="blue"
font-size="30"
font-weight="normal"
>
HELLO SVG!!
</text>
<text
x="10"
y="150"
textLength="300"
fill="green"
stroke="blue"
font-size="30"
font-weight="bold"
>
HELLO SVG!!
</text>
|
lengthAdjust
- 控制文本已说明方式伸展到由textLength属性定义的长度
- 参数:
- spacing: 只拉伸或压缩间距(文字不变形)
- spacingAndGlyphs: 同时拉伸或压缩间距和文字本身(文字变形)
- 示例:
1
2
3
4
5
6
7
8
9
10
11
12
13
14
15
16
17
18
19
20
21
22
23
24
25
26
27
28
29
30
31
32
33
34
35
36
37
38
39
40
41
42
43
44
45
46
47
48
| <text
x="10"
y="50"
textLength="140"
lengthadjust="spacing"
fill="green"
stroke="blue"
font-size="30"
font-weight="bold"
>
HELLO SVG!!
</text>
<text
x="10"
y="100"
textLength="140"
lengthadjust="spacingAndGlyphs"
fill="green"
stroke="blue"
font-size="30"
font-weight="bold"
>
HELLO SVG!!
</text>
<text
x="10"
y="150"
textLength="300"
lengthadjust="spacing"
fill="green"
stroke="blue"
font-size="30"
font-weight="bold"
>
HELLO SVG!!
</text>
<text
x="10"
y="200"
textLength="300"
lengthadjust="spacingAndGlyphs"
fill="green"
stroke="blue"
font-size="30"
font-weight="bold"
>
HELLO SVG!!
</text>
|
CSS文字属性
- 一些CSS中的文字样式属性同样也可以应用于SVG的文字中
- font-size、font-family、font-style、font-variant、font-stretch、font-size-adjust、kerning、letter-spacing、word-spacing、text-decoration等
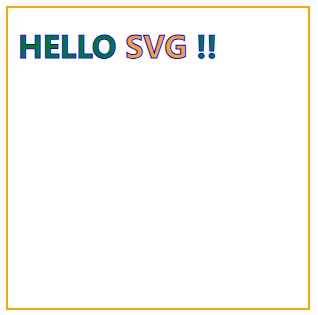
tspan 标签
- 标记文本中的部分内容。类似于span
- tspan标签的属性和text标签一致
- 注意:『tspan必须是一个text元素的子元素或别的子元素tspan的子元素』
- 注意:『tspan的x、y和dx、dy会影响标签后面的内容』
- 示例:
1
2
3
4
5
6
7
8
9
10
11
12
| <text
x="10"
y="50"
fill="green"
stroke="blue"
font-size="30"
font-weight="bold"
>
HELLO
<tspan fill="orange">SVG</tspan>
!!
</text>
|
tref 标签
- 配合xlink:href属性能引用已经定义好的文本,实现复制的效果。并且还可以自定义样式
- 2.0版本已废弃,只能用在SVG 1.1
- 2.0版本替代方案: 『use标签』
- defs标签可以定义一些之后绘制中需要重复使用的图形元素. 『defs中的元素定义id,没有使用不会展示』
- use标签可以在SVG文档内读取目标节点,并在别的地方复制使用。『use使用xlink:href复制对应元素的id,才会显示这个元素』
- 示例:
1
2
3
4
5
6
7
8
9
10
11
12
13
14
15
16
17
18
19
20
21
22
23
24
25
| <defs>
<text
x="10"
y="50"
id="text" // <---
stroke="blue"
font-size="30"
font-weight="bold"
>
HELLO SVG !!
</text>
</defs>
<use
x="10"
y="100"
fill="red"
xlink:href="#text" // <---
/>
<use
x="10"
y="150"
fill="pink"
rotate="45"
xlink:href="#text" // <---
/>
|

textPath 标签
- 利用xlink:href属性取得一个任意路径,并且可以让字符顺着路径渲染
- 示例:
1
2
3
4
5
6
7
8
9
10
11
12
13
14
| <path
id="pathM"
d="M 50 50 100 100 200 50 300 100"
fill="none"
/>
<path
id="pathQ"
d="M50 100 Q 175 200 300 100 T 600 100"
fill="none"
/>
<text>
<textPath xlink:href="#pathM">HELLO SVG !!</textPath>
<textPath xlink:href="#pathQ">HELLO SVG !!</textPath>
</text>
|
渐变
- 应用: 图形,文字, 轮廓
- 使用的标签及意义:
- defs标签:定义渐变
- stop标签:定义渐变的颜色坡度
- offset:渐变开始和结束的位置
- stop-color:颜色
- stop-opacity:透明度
线性渐变
- 语法:
1
2
3
4
5
6
7
8
9
| <defs>
<linearGradient x1="" y1="" x2="" y2="">
<stop offset="0%"/>
...
<stop offset="20%"/>
...
<stop offset="100%"/>
</linearGradient>
</defs>
|
- 参数:
- x1,y1:线性渐变的起点
- x2,y2:线性渐变的终点
- 示例:
1
2
3
4
5
6
7
8
9
10
11
12
13
14
15
16
17
18
19
20
21
22
23
24
25
26
27
28
29
30
31
32
33
34
35
36
37
38
39
40
41
42
43
44
45
| <defs>
<linearGradient
id="linearGradient"
x1="0"
y1="0"
x2="100%"
y2="0"
>
<stop
offset="0%"
stop-color="rgb(255,255,0)"
/>
<stop
offset="100%"
stop-color="rgb(255,0,0)"
/>
</linearGradient>
</defs>
<ellipse
cx="150"
cy="70"
rx="100"
ry="50"
fill="url(#linearGradient)"
/>
<text
fill="url(#linearGradient)"
font-size="100"
font-family="Verdana"
x="50"
y="200"
>
SVG
</text>
<text
stroke-width="5"
stroke="url(#linearGradient)"
fill="none"
font-size="100"
font-family="Verdana"
x="50"
y="280"
>
SVG
</text>
|

径向渐变
- 语法:
1
2
3
4
5
6
7
8
9
| <defs>
<radialGradient cx="" cy="" r="" fx="" fy="">
<stop offset="0%"/>
...
<stop offset="20%"/>
...
<stop offset="100%"/>
</radialGradient>
</defs>
|
- 参数:
- cx,cy:圆的坐标
- r:渐变半径
- fx,fy:渐变的中心点(渐变焦点)
- 示例:
1
2
3
4
5
6
7
8
9
10
11
12
13
14
15
16
17
18
19
20
21
22
23
24
25
26
27
28
29
30
31
32
33
34
35
36
37
38
39
40
41
42
43
44
45
46
| <defs>
<radialGradient
id="radialGradient"
cx="50%"
cy="50%"
r="50%"
fx="50%"
fy="100%"
>
<stop
offset="0%"
stop-color="rgb(255, 255, 0)"
/>
<stop
offset="100%"
stop-color="rgb(255, 0, 0)"
/>
</radialGradient>
</defs>
<ellipse
cx="150"
cy="70"
rx="100"
ry="50"
fill="url(#radialGradient)"
/>
<text
fill="url(#radialGradient)"
font-size="100"
font-family="Verdana"
x="50"
y="200"
>
SVG
</text>
<text
stroke-width="5"
stroke="url(#radialGradient)"
fill="none"
font-size="100"
font-family="Verdana"
x="50"
y="280"
>
SVG
</text>
|

裁剪和蒙层
裁剪 clipPath标签
- 定义一条裁剪路径,然后从元素中裁剪出对应的路径形状
- 无透明效果
- 示例:
1
2
3
4
5
6
7
8
9
10
11
12
13
14
15
16
| <defs>
<clipPath id="clipPath">
<path
d="M10 50 A50 50 0 0 1 100 50 A50 50 0 0 1 190 50 Q210 100 100 200 Q-5 100 10 50 Z"
/>
</clipPath>
</defs>
<rect
x="0"
y="0"
width="200"
height="200"
fill="#f00"
clip-path="url(#clipPath)" //<--
/>
|
蒙层 mask标签
- 裁剪并显示mask标签路径中的元素
- 与clipPath不同的是,可以有透明度(透明度为0 无蒙层效果)和灰度值遮罩计算得软边缘
- 示例:
1
2
3
4
5
6
7
8
9
10
11
12
13
14
15
16
17
| <defs>
<mask id="Mask">
<path
d="M10 50 A50 50 0 0 1 100 50 A50 50 0 0 1 190 50 Q210 100 100 200 Q-5 100 10 50 Z"
fill="#fff"
fill-opacity="0.5"
/>
</mask>
</defs>
<rect
x="0"
y="0"
width="200"
height="200"
fill="green"
mask="url(#Mask)" // <--
/>
|
动画
基础动画
translate 平移
- 语法:
1
| transform="translate(x, y)"
|
- 参数:
scale 缩放
- 语法:
- 参数:
- x:X轴上的缩放大小
- y:Y轴上的缩放大小,当两个值一样时,写一个值就可以
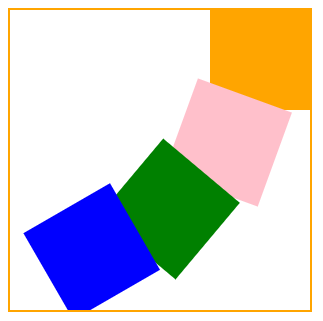
rotate 旋转
- 语法:
- 参数:deg:旋转的角度,不用带单位
- 注意:『元素的旋转中心点默认是svg布局的(0,0),而不是元素中心』
- 示例:
1
2
3
4
5
6
7
8
9
10
11
12
13
14
15
16
17
18
19
20
21
22
23
24
25
26
27
28
29
30
31
| <rect
x="200"
y="0"
width="100"
height="100"
fill="orange"
/>
<rect
x="200"
y="0"
width="100"
height="100"
fill="pink"
transform="rotate(20)"
/>
<rect
x="200"
y="0"
width="100"
height="100"
fill="green"
transform="rotate(40)"
/>
<rect
x="200"
y="0"
width="100"
height="100"
fill="blue"
transform="rotate(60)"
/>
|
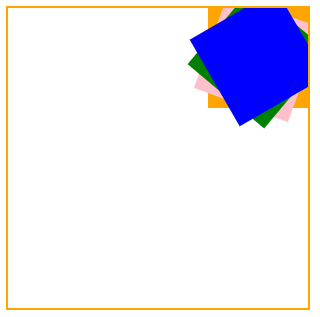
- 设置元素的中点
- 示例:
1
2
3
4
5
6
7
8
9
10
11
12
13
14
15
16
17
18
19
20
21
22
23
24
25
26
27
28
29
30
31
32
33
34
| <rect
x="200"
y="0"
width="100"
height="100"
fill="orange"
/>
<rect
x="200"
y="0"
width="100"
height="100"
fill="pink"
transform-origin="250 50"
transform="rotate(20)"
/>
<rect
x="200"
y="0"
width="100"
height="100"
fill="green"
transform-origin="250 50"
transform="rotate(40)"
/>
<rect
x="200"
y="0"
width="100"
height="100"
fill="blue"
transform-origin="250 50"
transform="rotate(60)"
/>
|
skew 倾斜
- 语法:
1
| transform="skewX(x) skewY(y)"
|
- 参数:
- 注意:『在SVG中skew属性需要分开设置,写成 skew(x, y) 是不生效的』
JS动画
- 用定时器setInterval来实现
- 通过更改对应属性来实现动画,不同框架有不同做法
- 如:
- 更改dom位置:3
1
| transform=`translate(${x}, ${y})`
|
- 更改路径:
1
| d=`M 250 100 300 0 ${x} 100 ${x1} ${y} z`
|
CSS 动画
- 使用@keyframes定义动画帧然后使用animation去调用
- 示例:
1
2
3
4
5
6
7
8
9
10
11
12
13
14
15
16
17
18
19
20
21
22
| <style>
#line {
stroke-dasharray: 500;
stroke-dashoffset: 500;
animation: animation 2s linear infinite;
}
@keyframes animation {
to {
stroke-dashoffset: 0;
}
}
</style>
<line
id="line" // <-- 或者 class="line"
x1="0"
x2="500"
y1="0"
y2="0"
stroke="orange"
stroke-width="10"
/>
|
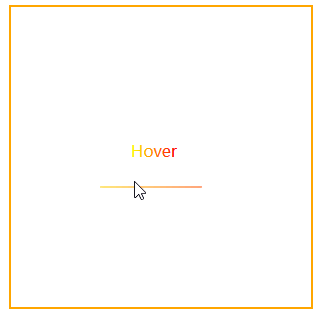
案例-动态框
- 主要改变stroke-dasharray 和stroke-dashoffset
- 示例:
1
2
3
4
5
6
7
8
9
10
11
12
13
14
15
16
17
18
19
20
21
22
23
24
25
26
27
28
29
30
31
32
33
34
35
36
37
38
39
40
41
42
43
44
45
46
47
48
49
50
51
52
53
54
55
56
57
58
59
60
61
62
63
64
| <style>
.line {
stroke-dasharray: 100 500;
stroke-dashoffset: -320;
}
.line:hover {
animation: animation 12s linear infinite;
}
@keyframes animation {
0% {
stroke-dasharray: 100 500;
stroke-dashoffset: -320;
}
100% {
stroke-dasharray: 700;
stroke-dashoffset: 0;
}
}
</style>
<body>
<svg
width="300"
height="300"
xmlns="http://www.w3.org/2000/svg"
style="border: 2px solid orange"
>
<defs>
<linearGradient
id="linearGradient"
x1="0"
y1="0"
x2="100%"
y2="0"
>
<stop
offset="0%"
stop-color="rgb(255,255,0)"
/>
<stop
offset="100%"
stop-color="rgb(255,0,0)"
/>
</linearGradient>
</defs>
<text
x="120"
y="150"
fill="url(#linearGradient)"
>
Hover
</text>
<rect
class="line"
x="50"
y="120"
fill="transparent"
height="60"
width="200"
stroke="url(#linearGradient)"
/>
</svg>
</body>
|
GreenSock(GSAP)
工具和插件
工具
- 生成SVG路径: 去iconfont网站找图标然后选择svg下载
- 然后复制代码,保留svg那一段然后用手动给图形添加id
- 之后使用use获取这个图标
- 路径生成: 使用Sketch辅助生成路径
- 示例:
1
2
3
4
5
6
7
8
9
10
11
12
| gsap.registerPlugin(MotionPathPlugin);
gsap.to("#airplane", {
duration: 3,
repeat: -1,
ease: Linear.easeNone,
motionPath:{
path: "#airplane-path",
align: "#airplane-path",
autoRotate: 45,
alignOrigin: [1, 1]
}
});
|
原出处:https://juejin.cn/post/7124312346947764260?searchId=202503101451055B89B2C172923C00C2DA#heading-75